Firebase Functions를 이용한 create-react-app SPA 앱의 SEO 처리
최근 create-react-app으로 만든 웹앱들을 Firebase의 Hosting을 이용해 서비스 하고 있다. 빌드된 Frontend Assets들만 배포를 하면 되니 무척 편리하다.
Firebase에는 Functions라고 하는 aws의 Lambda + Api-gateway를 합친듯한 기능을 제공한다. 특정 url 요청을 가로채서 node.js 스크립트를 실행할 수 있는 기능인데 이를 이용하면 SPA 웹앱의 귀찮은 부분 중 하나인 검색 엔진 최적화(SEO, search engine optimization) 처리를 할 수 있다.
이 글에선 https://blog.roto.codes/deploy-react-app-to-firebase/ 에 이어, create-react-app SPA 웹앱에 Functions를 연동하는 것을 설명한다.
아이디어
일반적으로 Firebase Hosting을 통해 배포된 웹앱은 어떠한 url 요청이 오든간에 배포된 index.html 파일만 정적 제공을 할 것이다.
여기에 Firebase Functions를 이용하면 특정한 url 요청 시, 해당 요청을 가로챌 수 있다.
이를 이용해 SEO 처리가 필요한 특정한 패턴의 url의 경우, index.html을 제공하기 전 해당 요청을 F가로채서 Functions를 이용해 SPA에서 공통으로 제공하는 index.html 파일 내용을 읽어들인 뒤 meta 태그를 원하는 내용으로 치환한 후 변경된 index.html 내용을 res.send를 이용해 제공하면 되지 않을까?
create-react-app 프로젝트 생성
우선 create-react-app을 생성하자.
typescript를 이용할 것이므로 아래의 커맨드로 생성한다.
npm install -g create-react-appcreate-react-app my-app —scripts-version=react-scripts-ts
cd my-app
npm start
firebase 프로젝트 생성 및 연동
http://console.firebase.google.com/ 에서 새로운 프로젝트를 만든다.
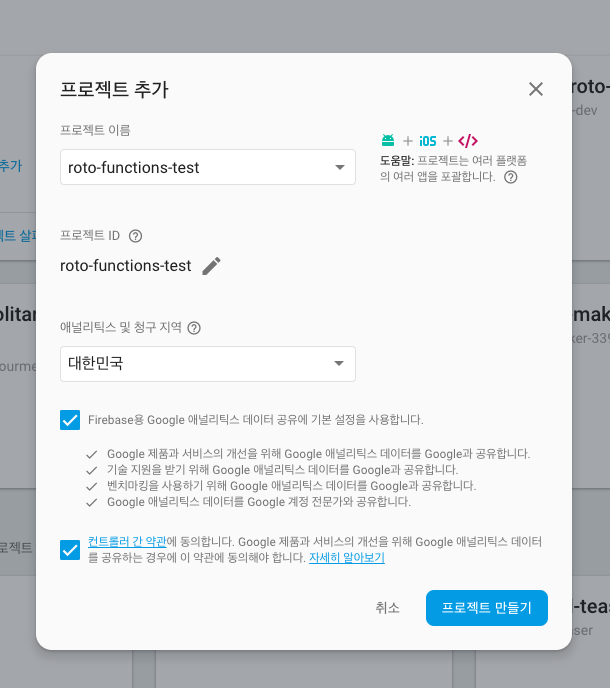
npm install -g firebase-tools를 설치한 후, firebase init 커맨드로 프로젝트와 생성한 firebase 프로젝트를 연동한다.
아래처럼 firebase에서 사용할 기능들을 선택하라고 나올텐데, 여기에선 Functions, Hosting을 사용할 것이므로 2가지를 선택한다.

다음으로 대상이 되는 프로젝트를 선택한다.
Functions setup
그 후 Functions에 사용할 스크립트 타입을 선택한다. JavaScript, TypeScript 두 가지 옵션을 제공한다.

여기에선 TypeScript로 해본다.
Hosting setup
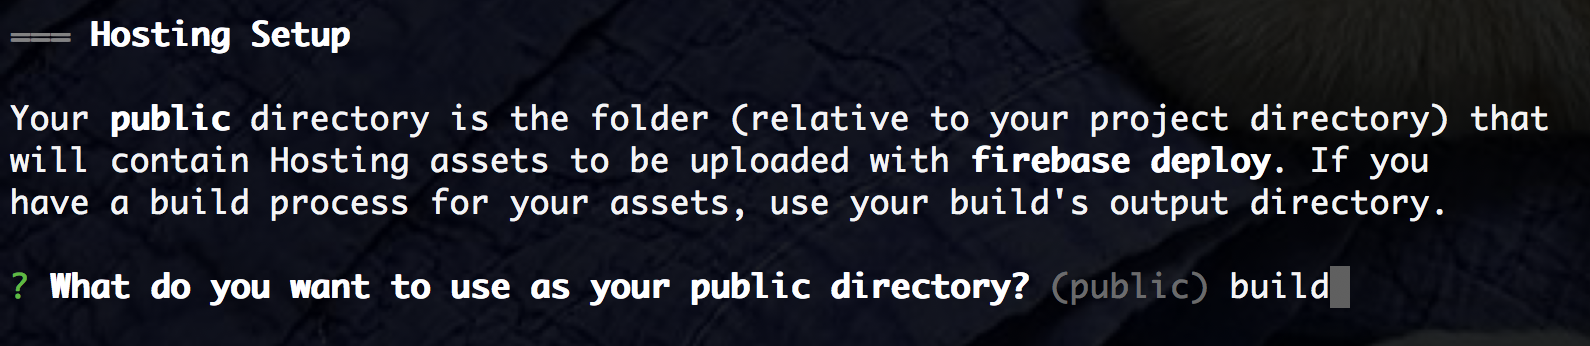
Hosting Setup에선 public directory는 build로 지정한다. create-react-app의 기본 빌드 결과물이 build로 나오기 때문.
이로써 functions 작성 준비는 끝났다.
코딩을 시작하기 전에 1: serviceworker 끄기
create-react-app에선 기본적으로 serviceworker 관련 코드를 생성한다.
src/index.tsx를 다음 코드로 고쳐서 serviceworker를 제거하자.
안 그러면 캐시 때문에 골치아프다.
import * as React from 'react';
import * as ReactDOM from 'react-dom';
import App from './App';
import './index.css';
import { unregister } from './registerServiceWorker';
ReactDOM.render(
<App />,
document.getElementById(‘root’) as HTMLElement
);
unregister(); // serviceworker 비활성화
코딩을 시작하기 전에 2: 빌드 스크립트 수정
Functions 작성에 앞서, 프로젝트 루트의 package.json의 다음 스크립트를 추가한다.
...
"scripts": {
    ...
    "build": "react-scripts-ts build",
    "postbuild": "cp -r build/index.html functions/",
    ...
  },
...
이는 SPA 앱 빌드 이후 생성된 index.html을 Functions 아래에도 카피하기 위함이다.
request 등의 모듈을 통해 Hosting에 업로드 된 index.html을 가져울 수도 있지만, Functions 무료 버전에서는 Functions 내에서 외부 도메인 요청을 할 수가 없다고 한다.
Functions tsconfig.json 수정
functions 폴더 아래에 있는 tsconfig.json의 "compilerOptions" 에 아래의 설정을 추가한다.
{
  "compilerOptions": {
    "lib": ["es6"],
    "module": "commonjs",
    "noImplicitReturns": true,
    "outDir": "lib",
    "sourceMap": true,
    "target": "es6"
  },
  "compileOnSave": true,
  "include": [
    "src"
  ],
  "files": [
    "node_modules/typescript/lib/lib.es6.d.ts"
  ]
}
이걸 추가 안 하면 빌드하다 아래와 같은 에러가 난다.
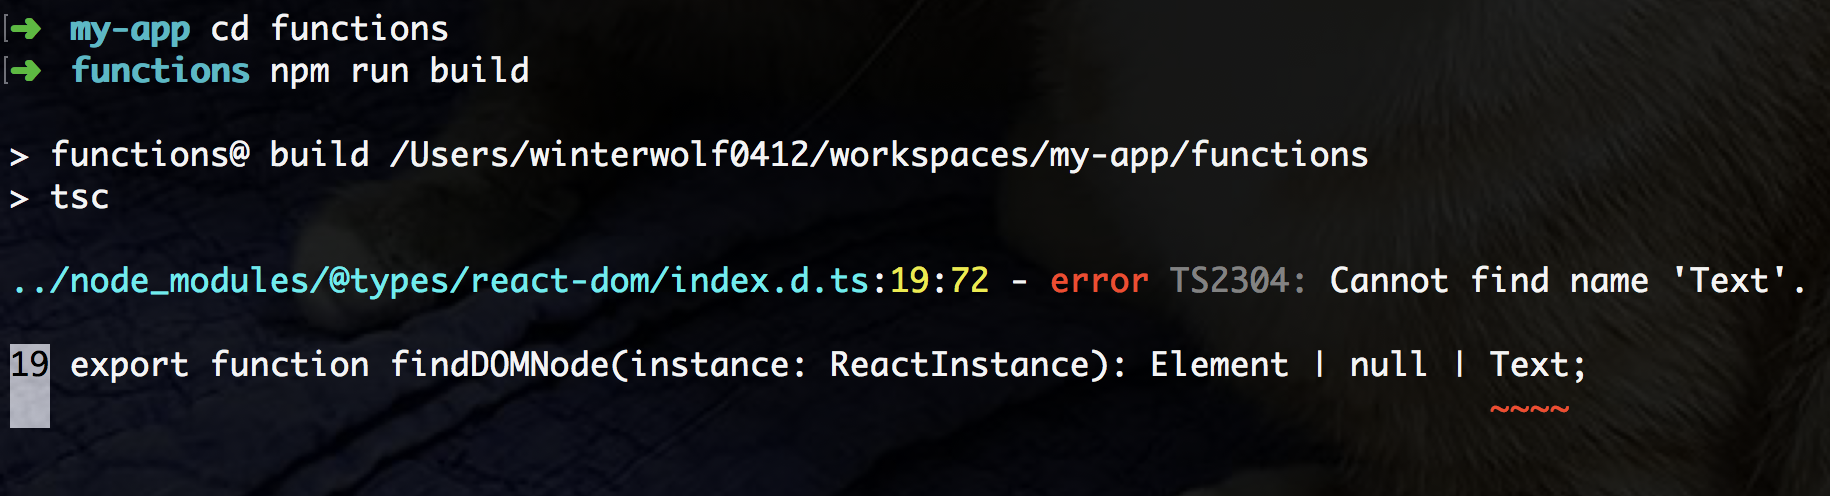
이유는 잘 모르겠다. 상위 폴더에 있는 node_modules를 참고하는 건가 싶기도 한데 저 옵션이랑 무슨 상관이 있는지 TypeScript 잘 아시는 분이 댓글 달아주셨으면 좋겠다.
Functions에 express 설치
functions 라는 폴더가 생겼을 것이다. 여기에 사용할 Functions의 스크립트를 작성한다.
이 폴더에는 프로젝트 루트와는 별개로 package.json이 있는데, 이를 통해 create-react-app으로 만든 프로젝트와는 별개라는 것을 알 수 있다.
우선 편한 url 처리를 위해 express를 설치한다.
# project root에서 functions 폴더로 이동 cd functionsexpress 설치
npm install —save express
functions/src/index.ts 작성
functions/src/index.ts 파일이 자동으로 생성되어있을 것이다.
이곳에 스크립트를 작성한다.
먼저 express app을 생성한다.
import * as express from 'express'
import * as functions from 'firebase-functions'
import * as fs from 'fs'
const app = express()
/article/:articleId 라는 get 요청을 처리하는 함수를 작성한다.
app.get('/article/:articleId', (req, res) => { const { articleId } = req.paramstry { // CRA 빌드 후 functions로 복사된 index.html의 내용을 읽어들인다. fs.readFile(‘./index.html’, ‘utf8’, (err, htmlString) => { res.set(‘Content-Type’, ‘text/html’)
// 읽어들인 html 내용을 정규표현식을 이용해 <title> 태그를 갈아치운다. const replacedHTML = htmlString.replace( /<title>(.*?)<\/title>/, `<title>${articleId}번 게시물 요청</title>` ) // 갈아치운 html 내용을 response에 내보낸다. res.send(new Buffer(replacedHTML)) })
} catch (e) {
res.redirect(’/’) } })
마지막으로 위에서 만든 express app을 articleDetail이라는 이름으로 functions.https.onRequest 함수를 통해 내보낸다.
export const articleDetail = functions.https.onRequest(app)
Hosting과 Functions 연결하기
이제 Functions가 준비되었으니 Hosting에 연결하면 된다.
관련 설정은 프로젝트 루트에 있는 firebase.json 파일에서 할 수 있다.
해당 파일에 "hosting"의 "rewrites" 부분에 아래와 같은 식으로 url과 Functions를 매핑한다.
{
  "source": "url pattern",
  "function": "functions에서 export한 함수 이름"
}
이렇게 하면 Hosting에 source에 해당하는 url 호출 시 매핑한 function이 실행된다.
위에서 작성한 코드를 추가하면 아래와 같을 것이다.
...
  "hosting": {
    "rewrites": {
      {
        "source": "/article/**",
        "function": "articleDetail
      },
      ...
    }
  },
...
전체 firebase.json의 코드는 아래와 같다.
{
  "functions": {
    "predeploy": [
      "npm --prefix \"$RESOURCE_DIR\" run lint",
      "npm --prefix \"$RESOURCE_DIR\" run build"
    ],
    "source": "functions"
  },
  "hosting": {
    "public": "build",
    "ignore": [
      "firebase.json",
      "**/.*",
      "**/node_modules/**"
    ],
    "rewrites": [
      {
        "source": "/article/**",
        "function": "articleDetail"
      }
    ]
  }
}
테스트 하기
firebase serve 명령어로 로컬에서 서버를 띄워서 위에서 작성한 내용들을 테스트 할 수 있다.
--only functions 옵션으로 Functions만 띄울 수 있으니 Functions만 띄워보자.
그전에 앱 빌드부터.
# 프로젝트 루트에서 실행
npm run build
functions 폴더에 index.html이 복사되었는지 확인한다.
cd functions
npm run build
firebase serve —only functions

http://localhost:5000/roto-functions-test/us-central1/articleDetail url 호출을 통해 Functions 에 작성한 articleDetail 함수를 실행해볼 수 있다.
curl을 이용해서 찔러보자. 저 url 뒤에 url 매칭 패턴을 붙인다.
http://localhost:5000/roto-functions-test/us-central1/articleDetail/article/5 같은 식으로.

보면 title 내용이 의도되로 변경된 걸 확인할 수 있다.
배포 후 테스트하기
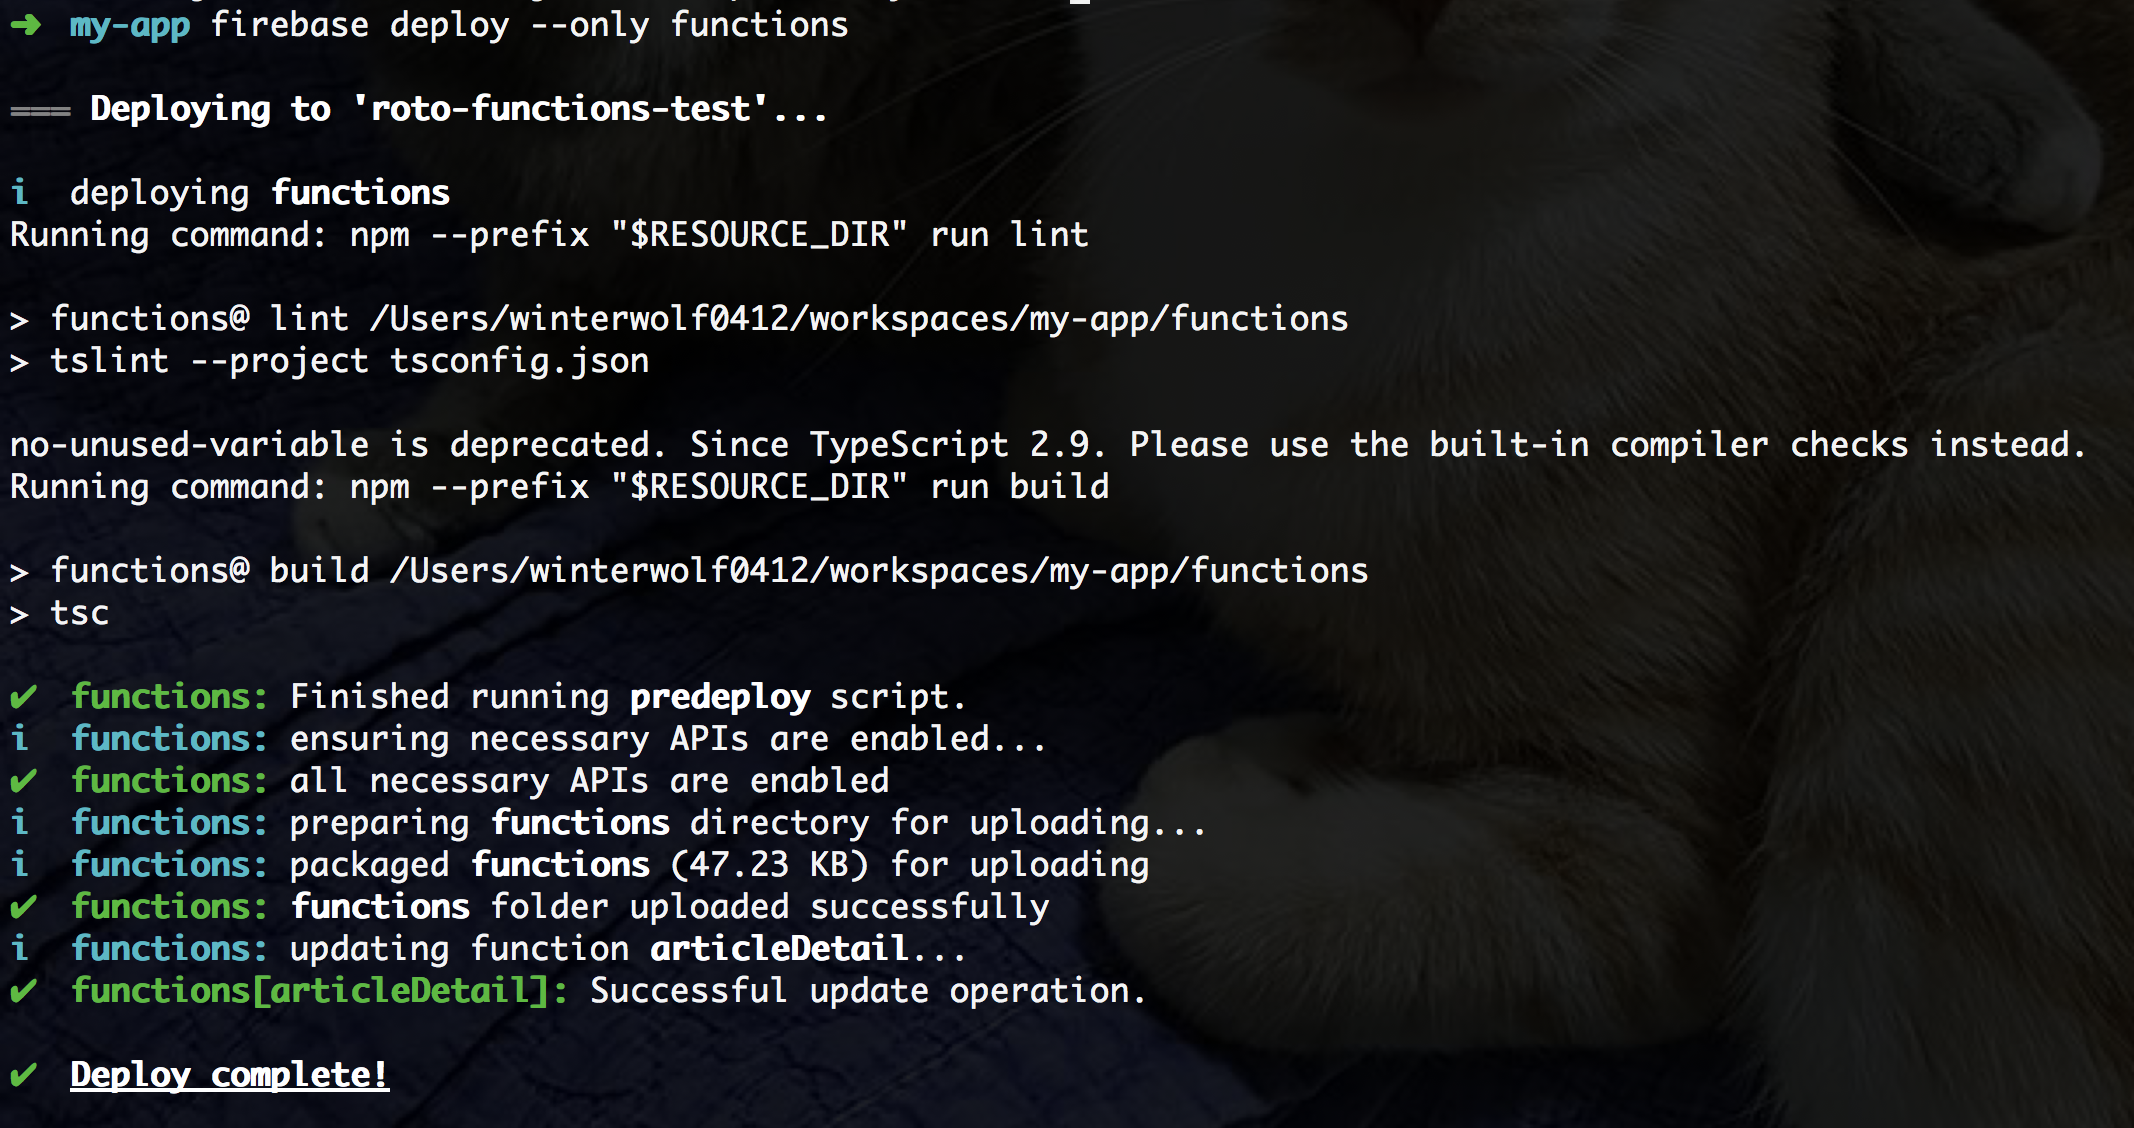
firebase deploy 명령어를 실행하여 Hosting, Functions 모두 배포한 후 테스트해보자.
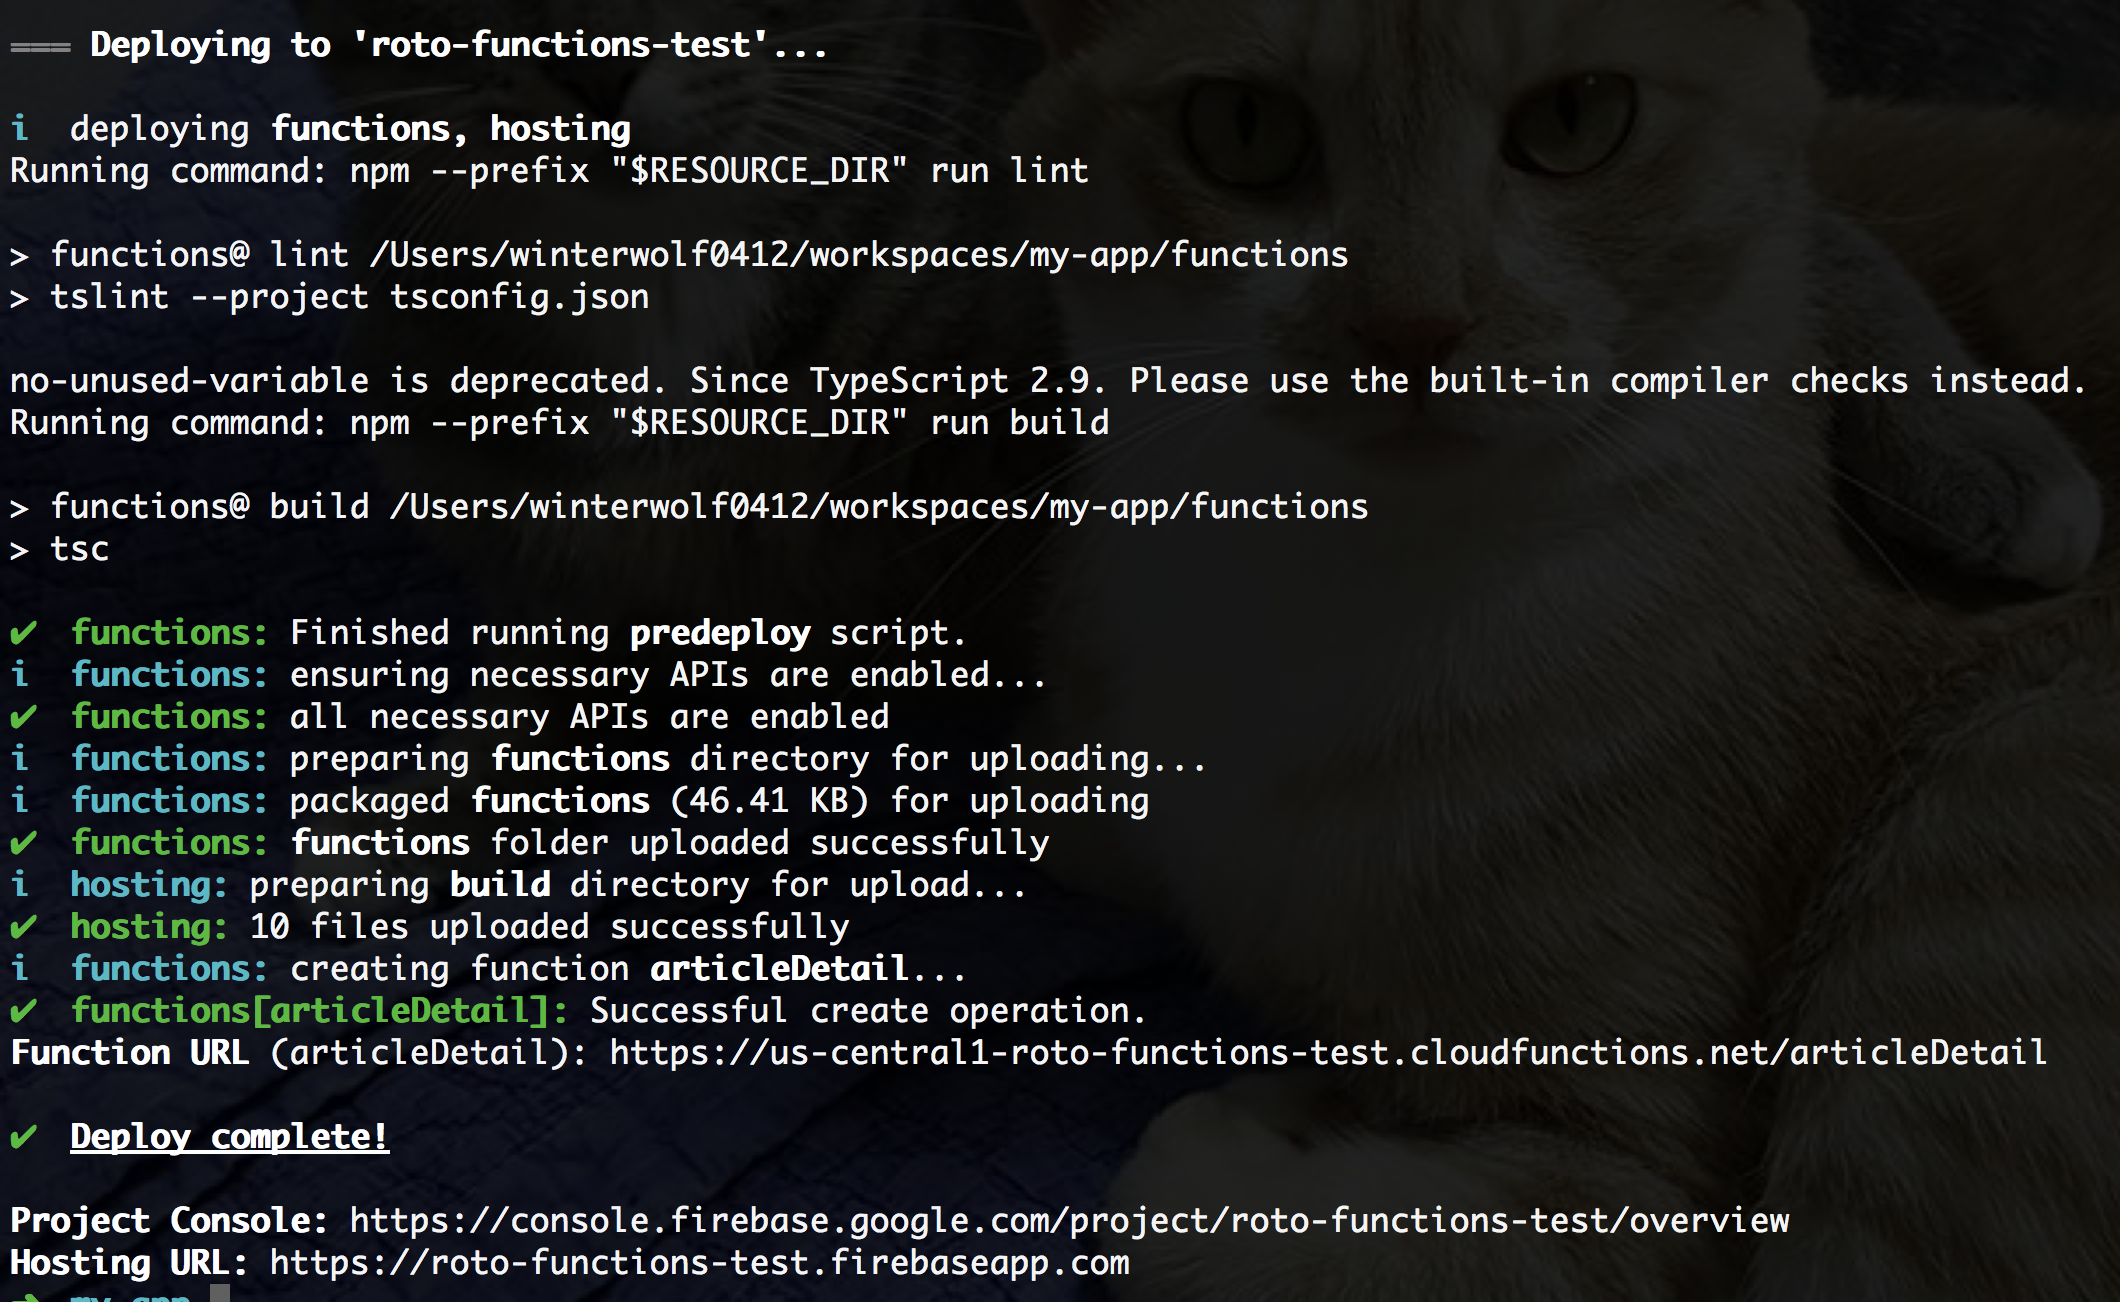
배포 후 Firebase 웹 콘솔에서 Hosting과 Functions가 배포가 잘 되었는지 확인하자.

먼저 Functions를 호출하지 않는 url로 접속해보자.
여기에선 https://roto-functions-test.firebaseapp.com/ 로 접속한다.
기본 title로 나오는 것을 확인할 수 있다.

https://roto-functions-test.firebaseapp.com/article/5 와 같은 url로 접속해보자.
그러면 firebase.json에 설정된 article/** url 패턴에 의해 Functions의 articleDetail 함수가 실행되고 해당 함수에 의해 title이 변경될 것이다.

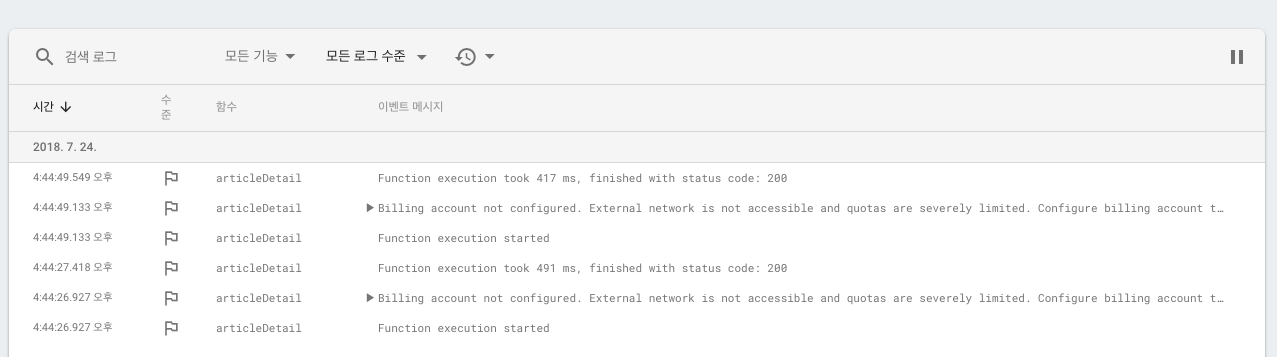
Firebase Web Console의 Functions - 로그 항목에서 로그를 확인할 수 있다.
응용1: meta 태그 삽입하기
title만 갈아끼우는 것으로는 SEO 처리를 했다고 보기 어렵다.
head 태그 사이에 SEO에 필요한 meta 태그와 Open Graph meta 태그를 추가해보자.
functions/src/index.ts를 수정한다.
import * as express from 'express' import * as functions from 'firebase-functions' import * as fs from 'fs'const app = express()
app.get(‘/article/:articleId’, (req, res) => { const { articleId } = req.params
try { fs.readFile(‘./index.html’, ‘utf8’, (err, htmlString) => { res.set(‘Content-Type’, ‘text/html’)
const title = `${articleId} 번 게시글 : Firebase + Functions Test` const description = `${title}에 대한 내용` const url = 'YOUR_FIREBASE_APP_URL' const imageUrl = 'https://cdn.freebiesupply.com/logos/large/2x/react-native-firebase-1-logo-png-transparent.png' let replacedHTML = htmlString.replace( /<title>(.*?)<\/title>/, `<title>${title}</title>` ) replacedHTML = replacedHTML.replace( /<\/head>/, ` <meta name="description" content="${description}" /> <meta name="url" content="${url}" /> <meta name="identifier-URL" content="${url}"> <meta property="og:title" content="${title}" /> <meta property="og:type" content="website" /> <meta property="og:url" content="${url}" /> <meta property="og:image" content="${imageUrl}" /> <meta property="og:site_name" content="Firebase + Functions Test" /> <meta property="og:description" content="${description}" /> <meta name="twitter:card" content="summary_large_image" /> <meta name="twitter:creator" content="@winterwolf0412" /> </head> ` ) res.send(new Buffer(replacedHTML)) })} catch (e) {
res.redirect(’/’) } })
export const articleDetail = functions.https.onRequest(app)
저장 후 배포한다. 배포 시 --only functions 옵션을 이용하면 Functions만 배포할 수 있다.
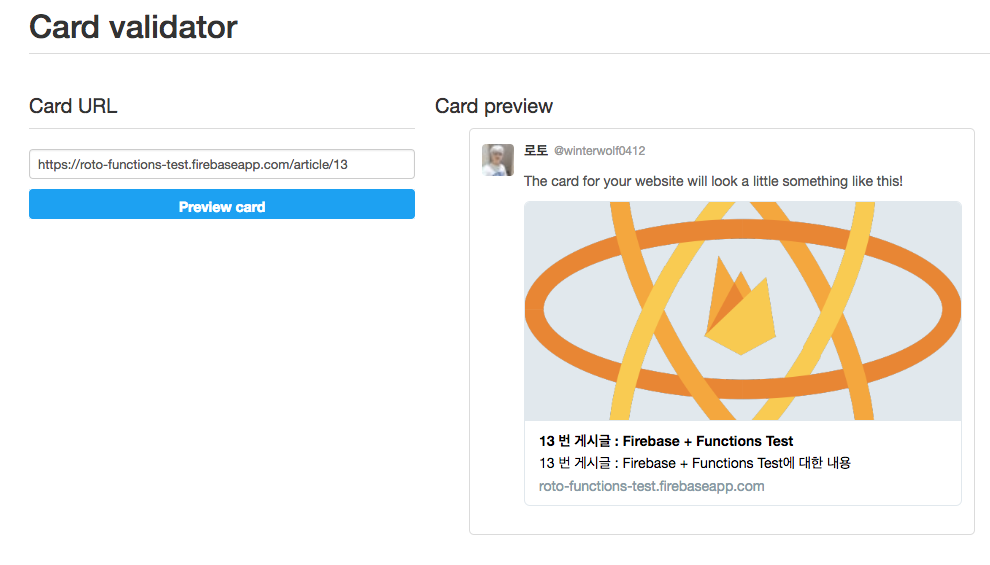
https://roto-functions-test.firebaseapp.com/article/11 와 같은 url로 접속한 후, 소스 보기를 하면 meta 태그가 들어가있는 것을 볼 수 있다.
twitter card validator(https://cards-dev.twitter.com/validator)로 테스트 해보자.
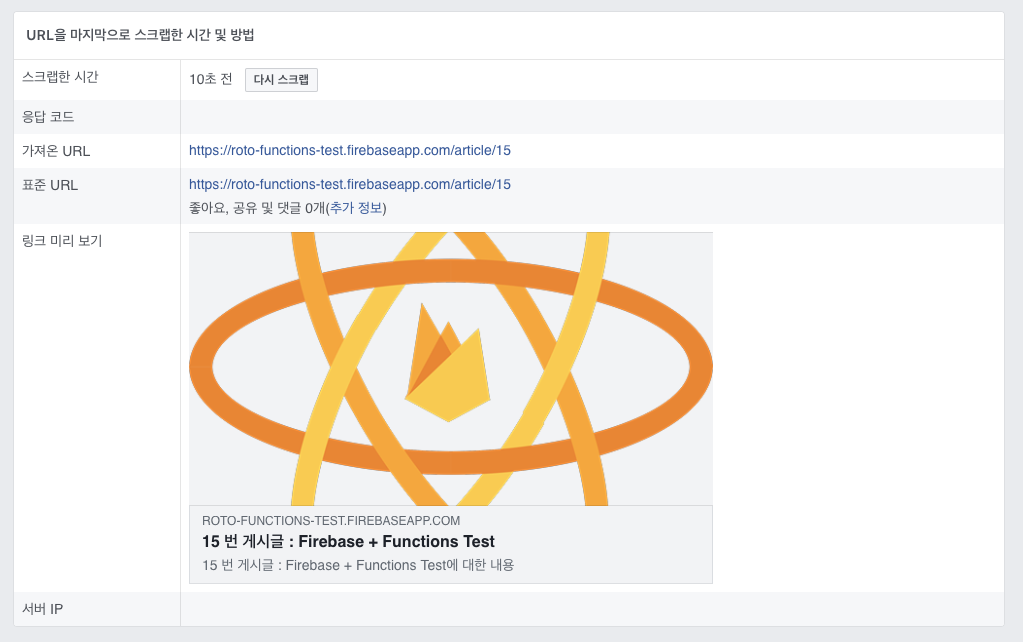
Facebook Open Graph Debugger Test
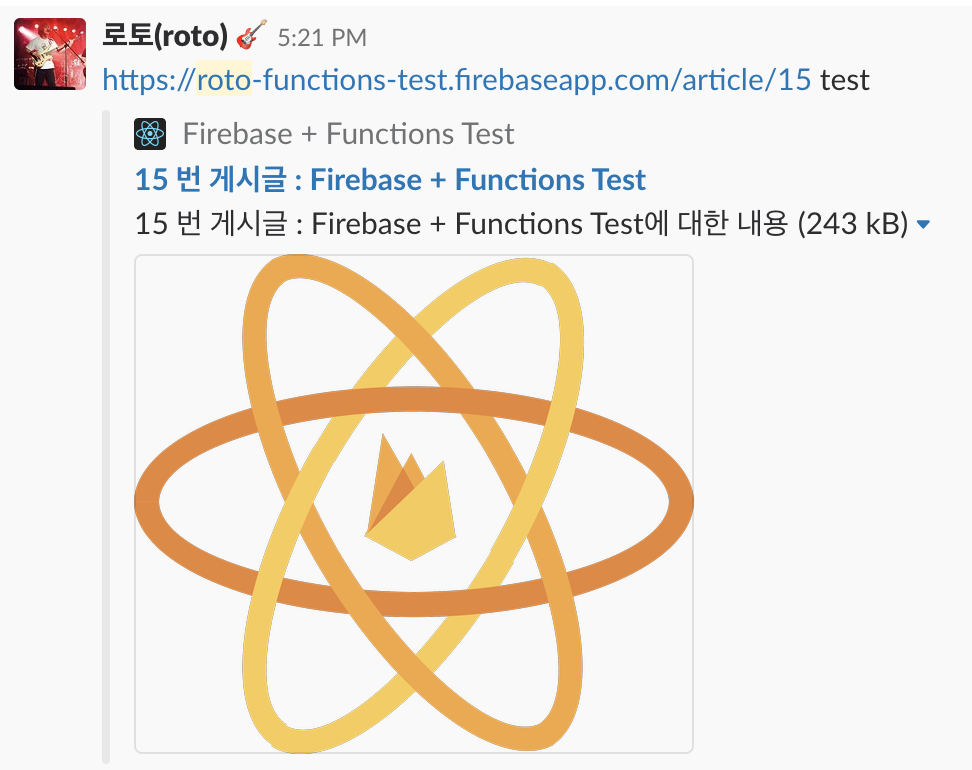
이번엔 Slack 테스트
응용2: react-dom-server
index.html을 갈아끼는 수준을 넘어서 아예 Server Side Rendering까지 해버릴 수도 있다.
이건 다음 기회에.
문서 링크
- Firebase Functions 문서 - https://firebase.google.com/docs/functions/?hl=ko
- 이 블로그 글의 예제 코드: https://github.com/rotoshine/roto-functions-test